Onward to part 3, the final part of my DIY Zombie Decorations. You can find the original post HERE. Part 1, the Bloody Zombie Cake can be found HERE, and check out my Zombie Posters that double as a party game HERE.
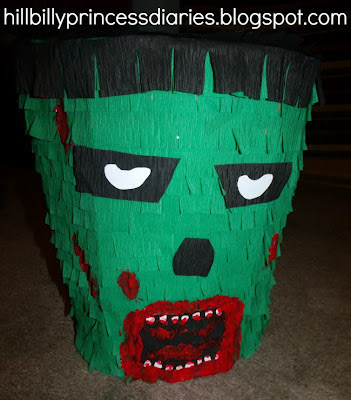
Lets get started with my favorite of all of my Zombie DIY's, The PINATA!! I've never made a pinata before, this was a first..and I was pretty pleased with how it turned out. Each kid got to whack it at least about three times, (we went from smallest kids to biggest of course because the bigger kids had a better chance at busting it & we wanted to give the smaller kids a chance.) Which everyone got plenty of chances, the last kid to whack at it knocked it down, which is when each of the kids then got to try and hit it a few more times while it was on the ground. They had a blast & I was pretty proud at how well it held up to kids beatings! (which aka one of the kids said it looked like Frankenstein so this would be great for any Halloween party!)
I promise it's a lot easier then it looks!
Supplies:
1 Cardboard Box
Tape
1 Pack of Green Streamers
1 Pack of Black Streamers (both packs of streamers were $1 a piece at Dollar Tree)
Red Paint (for blood)
A piece of plain white computer paper (for eyes and teeth)
String (to hang the pinata with)
And CANDY! yummm.
TUTORIAL:
1. First I took my cardboard box (which I got off my aunt-in-law) and I broke it down. (which if you've never worked in a resturaunt & don't know what that means, you just take it out of its box form to be flat, but then I cut each side out so i had all kinds of pieces.
2. Next I figured out what shape I wanted his head to be in and started with cutting out the circle for the top of his head (which would be flat since nobody would be seeing the top of his head anyways)
3. I poked a hole in the top of the head and went ahead and put my string in & tied it in a knot on the inside. Now we don't have to worry about how were going to hang it after we've put it together and cant get to the inside as good.
4. Next I used regular clear packaging tape to start taping more strips of the boxes on to get the head to be the shape I wanted it.
5. Once you get the pinata to the shape you want it, we are going to get our crepe streamers ready which you can buy a pack of 2 for $1 at the dollar tree and one of the rolls goes a long way.
6. We are going to start at the bottom and make our way up. I first took the streamer and wrapped it around where it will be going to see how much I needed. I cut off that strip and started cutting little slits going a little more then halfway up the streamer all the way down the strip.
Then I wrapped it around it & taped it on.
7. Now we will continue step 6 over and over all the way up until we've completely covered the pinata!
8. HAIR. I didn't get pictures of the next few steps because my camera died but it's very easy what I did. I took the black streamer and done the same thing I done for the green streamer but only for the top layer or two and top of head. This makes the zombie's hair, you can look at the finished picture to get an idea of what I am talking about.
9. EYES & MOUTH. I also used black streamer to make a mouth & eyes, just cut strips and tape them on. The I used white computer paper to cut out teeth and eyes. I just drew out what I wanted the white of the eyes to look like and random looking teeth, cut each of them out & taped them onto the black streamer I had already placed.
10. Next I took some red paint (which was actually a 4 pack of finger paint I got at the dollar tree for $1) and I just dabbed my finger in it & smeared it all over the zombies mouth & a few spots on its face. Doesn't have to be perfect, Zombies are messy so just randomly glob it on there.
11. Cut a hole in the top of his head to put candy in, fill him up & your done.
(P.S. Sorry it took so long to get this post up, I have been working like a maniac on the house aka Project: Making Home (which don't worry I will be having more posts coming up soon on what I'm doing and how I'm slowly progressing to turn that old dump into my home. I'm actually supposed to be working on it now but thought I had better put up a blog post first. So Now I am off here to go out & start making a home LOL.)
Hope you all enjoyed my Zombie themed party decorations! & If you try them out comment and let me know so I can check them out. I would love to see how yours turns out! :)


Fun idea! Zombies are everywhere right now!!
ReplyDeleteThank you so much for linking up with us at Keep Calm & Link Up this week! We love getting to see your new projects and ideas each week! Have an awesome weekend!! :)
Love this! Zombies are fun! Thanks for linking up to the CHQ Blog Hop! Happy to be following along with you! Hope to see you back next week!
ReplyDeleteVery cool! Thanks for linking up to the CHQ Blog Hop! See you again next week!
ReplyDeleteBarbara at Chase the Star
chasethestar dot net
Stopping by from Piggy In Polka Dots and want to invite you to link up your pinata to my Halloween Edition Link Party! I have never attempted the DIY pinata but have often wanted to!!
ReplyDeleteIt's honestly not as intimidating as it seems, I had fun making this one and will probably be attempting another one soon. The kids had a blast with this pinata also, it was a lot tougher then I expected it to be, I was worried they would bust it first hit but none of the kids could but it, it ended up taking an adult to finish it off!! & it's so cheap so its a party must! Thank you so much for stopping by and commenting :)
Delete