Okay so I have a bunch of projects in the midst of my mind. All kinds.
I'm trying to get around to working on them while i manage my crazy life. I just have so many ideas I never know which ones to start on. However I have made a decision and have something in the process of being made.
It's a Family-Home Binder.
& let me tell you, this sucker has had me changing my mind a thousand times. I read a bunch of other peoples categories and what they put in it but my life is strange and so I have subjects I need others don't have and there's subjects alot of other people have but I just don't feel the need for.
So I have started with a list of all kinds of random things I would like to put in my binder. Receipts, homework assignments (since I'm still in college), to do list, calender, contacts, passwords, etc. and I've tried to organize them how I want them in order in the book and what will go where and what categories and subcategories there will be and lets just say the page is covered in scribbles since I've been moving everything around. I just want to have it completely planned out before I actually print everything & stick them in my book in case I change my mind last minute. I already have my binder & dividers & such. So be looking for a organizational binder comin from me soon. :)
-ashley the hillbilly princess


Wednesday, February 29, 2012
Tuesday, February 21, 2012
First Reupholster project. woot woot!
Yes I reupholstered something for the first time, and gosh i had to Google that word to make sure i spelled it right, Reupholster. LOL oh and I was WRONG. haha. Besides that, my stepdad & I decided to take on the challenge of Re-upholstering my moms new dining room chairs she just got. The seats were white & she was worried it would be too messy. She bought the fabric but kept putting off doing it, so me & the stepdad decided to do it for her as a surprise. This was also my first time ever using a staple gun (nobody ever trusted me enough to let me use one before.) I didnt take pics of each step but I do have before & After pics. Im kinda proud. ENJOYYY.


*BEFORE*


*AFTER*


Had fun & Im kinda proud lol
See Ya'll Soon,
The Hillbilly Princess
Tuesday, February 14, 2012
No Valentines?...Love Pond!
Okay... So believe it or not I have nothing to share for Valentines Day. No cute nails (which i usually try to do to match the holidays). No cute recipes (I tried my hand and some cute heart cookies but it was a hugeee FAIL! they burnt.) & No cute Valentines Crafts? Then what am I even writing a post for??? Well this isn't Valentines Related but its Love related so close enough right? Last month I made a cute lil sentimental project for the husband. Very sappy and lovey but he's sentimental and he liked it. We even made a game out of it.
So to explain this thing i made, the husband LOVES to fish, like once it hits fishing season best believe he's out on the creek fishing (okay with me tho cause it gives me more time to craft & be nerdy.) Anyways, so anything incorporating fishing he usually loves. So I decided just to tell him some random reasons why I loved him. This was done for one of those insignificant anniversary things for our anniversary when we moved in together. Sorry for the long intro: but here we goooooo.....
26 Reasons Why I Love You-LOVE POND.
THIS IS A FISHING POND, FULL OF CUTE LITTLE FISH JUST WAITING TO TELL MY HUSBAND ALL KINDS OF DIFFERENT REASONS WHY I LOVE HIM.


 3. TAPE BOTTOM OF POND IN THE CONTAINER.


So to explain this thing i made, the husband LOVES to fish, like once it hits fishing season best believe he's out on the creek fishing (okay with me tho cause it gives me more time to craft & be nerdy.) Anyways, so anything incorporating fishing he usually loves. So I decided just to tell him some random reasons why I loved him. This was done for one of those insignificant anniversary things for our anniversary when we moved in together. Sorry for the long intro: but here we goooooo.....
26 Reasons Why I Love You-LOVE POND.
THIS IS A FISHING POND, FULL OF CUTE LITTLE FISH JUST WAITING TO TELL MY HUSBAND ALL KINDS OF DIFFERENT REASONS WHY I LOVE HIM.

SUPPLIES NEEDED:
- A CONTAINER. in whatever shape you want, I used this cause it was what I had it's a package left over from ear muffs.
- SCRAPBOOK PAPER. or construction paper, to add color and background to it.
- PRINTED FISH. I googled fish and printed them out to write my reasons on them. Or you could hand draw your fish, whatever floats your boat.
- TAPE. to hold the paper onto the container
- PEN. to write on the labels and the fish
- PAINT (OPTIONAL). I actually painted the bottom paper blue and the pond on the top cause I was almost out of blue scrapbook paper, and I actually printed out black & white fish to save my ink & painted them orange (but that's more work) so its totally optional.
- SCISSORS. to cut your fish out
- & THE REASONS WHY YOU LOVE THEM.
now, TUTORIAL TIME.
1. FIRST, MAKE THE WATER. I wrapped a piece of blue designed scrapbook paper to see if it would fit all the way around the bottom rim of my container & then cut it to look like waves of water. (not realistic waves, cartoonish waves lol)


2. MAKE BOTTOM OF POND. So I used the lid of the container to trace a circle onto a piece of plain white computer paper. Painted it blue, & used a sharpie to write a message on the bottom for when he gets to the bottom of the pond. Then i cut it out carefully.


4. MAKE A LID LABEL. I then cut out a random shape like a odd shaped pond & painted it blue same way I did the bottom of the pond. Cut it out, & Write LOVE POND on it, so its obvious what the gift is supposed to be lol. Then i taped it to the lid of the container.


5. NEXT I PRINT OUT ALL MY FISHY'S. I chose to do 26 just because I needed some sort of limit so i figured I'd make one reason for every letter in the alphabet (which ended up being a fun lil game for us which i'll explain at the end)

6. CUT THEM SUCKERS OUT. lol

7. WRITE A REASON WHY YOU LOVE THEM ON THE BACK OF EVERY FISH!


8. ADD A LABEL TO THE FRONT. I cut a pretty designed strip of scrapbook paper big enough to cover up the words on the container. Then I just used a sharpie to write "26 Reasons Why I Love You"

9. THROW ALL THE FISH IN THE POND. they like the water, i promise. lol.

& YOUR DONE. THATS IT. NOW YOU HAVE A CUTE ROMANTIC WAY TO SHOW SOMEONE THAT YOU LOVE THEM.
FUN LITTLE GAME:
When i gave this to him before I let him read the fish I told him there was one for every letter, then i drew them out and told him the letter, & he had to guess what the reason was why i loved him that had to do with that letter. Of course he only got like 1 or 2 right, haha but he learnt a whole bunch of new reasons why i love his crazy butt. =)
Much Love on this Valentines Day,
The Hillbilly Princess
Wednesday, February 8, 2012
DIY Butterfly Globe
Im not sure exactly what to call this. A butterfly globe habitat thing. I did not come up with this idea, i found it on pinterest from this lovely person's website: http://sweetpaul.typepad.com/my_weblog/2011/06/cr-2.html
Mine may not have turned out as good but my mom LOVED It. I made it for her as a birthday present, i know im a little late posting it! But here's my tutorial on how I did it.


Mine may not have turned out as good but my mom LOVED It. I made it for her as a birthday present, i know im a little late posting it! But here's my tutorial on how I did it.

DIY Butterfly Globe Habitat
1. FIRST, GLUE THE BRANCH TO THE PLATE. I bought this small clear plate to match the vase I got both at the Dollar tree a dollar a piece. I also bought some E-6000 glue from Walmart for like 2 or 3 dollars (crazy glue would not hold the stick up.) Found a nice branchy looking stick outside of my college early one morning.

2. LET IT DRY. The E-6000 glue took like overnight to dry, so I used an empty card box & a card just to hold it up til it was completely dry the next day. (i just wanted something light that wouldn't knock my stick over either way but would hold the stick still til it had time to dry).

3. PRINT OFF & CUT OUT BUTTERFLYS. or whatever creature u want to put in your little habitat! I just googled pictures of butterflys and printed about 6 of them some big some small in all different colors. I then used my X-acto knife to cut out each one.

4. GLUE BUTTERFLY'S TO BRANCH. So this time I just used crazy glue to stick all the butterfly's in random places on the branch. (try not to make them stick out too much though becuz gotta get the top over it without breaking and branches or takin off any butterflys.)

5. PUT THE TOP ON & YOUR DONE. you can crazy glue it if you want, I did but just a few dots so its not too noticeable. & BAM...a beautiful creation.

Hope you guys enjoyed this fun little craft, I enjoyed it & i loved the way it turned out. My mom loved it as well. <3
Love,
The Hillbilly Princess
Wednesday, February 1, 2012
DIY Cake Stand!
2 posts in one day, man I'm on a roll lol. Again I'll repeat it's my moms birthday. She had mentioned a while back she wanted cupcakes, so I made her some. & one thing about my mommy is she is just like me. CHOCAHOLIC. So I got Triple Chocolate Fudge Cake mix and Chocolate icing her favorite. I also bought edible pearls for the cupcakes. For the cake stand I got a small mini cake stand for about $4 at Walmart. I also bought a pack of mini glass pearls from the craft and bead section of Walmart for $2.50. They had all different sizes but I got the smallest ones I could find so it was kinda not so crazy and almost looked like the same pearls as on the cakes lol. I crazy glued the beads to the cake stand so the cake stand would be decorated and pretty just like the cupcakes. This did take a while to do so make sure u do this a while ahead of time because the glue takes a while to dry.


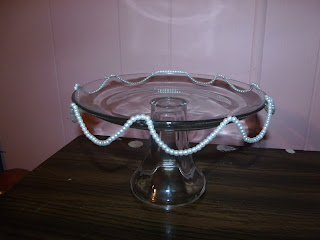


DIY CAKE STAND TUTORIAL

NOW ON TO THE EASY TUTORIAL:
Supplies used:
Cake plate $4 (Walmart)
Glass Pearls $2.50 (Walmart)
Crazy Glue $1
Doilie (optional) $1/pack of 40 (Dollar General)

1. PLAN OUT THE SIZE OF THE LOOPS. This is your cake plate you can design it how you want, large drapey loops hanging or right on the plate, you pick the length you like your drapes to hang.

2. CRAZY GLUE THE BEADS TO THE CAKE PLATE. I did not take the beads off the string because I dont want to glue every bead, just keep the string held tight. I'll warn you now, It takes about 5 or 10 minutes to get the beads to actually stay on to where it dont fall off. So you will have to hold it the first 5 or 10 minutes, then i left it there and would walk off for about 15 or 20 minutes until I was sure it was dry. Then I would come back and start on another loop until I made my whole way around the cake plate.


3. LET IT DRY COMPLETELY.

4. YOUR DONE. You can choose to decorate with a doilie like i did but its completely optional. So this was a tutorial using 3, or optionally 4 items. Simple right?


Hope you guys enjoyed this, I am pretty proud of it. My mom loved it.
Yours Truly,
The Hillbilly Princess!
Happy Birthday to my Mom!
It's my moms birthdayyyyy!! I made her a few things aside from the mini fridge I got her. But to start of the day I knew she had to wake up at 7:30, so i snuck & got up @ 7 and cooked her breakfast & brought it to her in bed and woke her up!! I'll post some pics of my recent projects soon but first off to celebrate my mommys birthday, here is her breakfast!


THE POP IS ALWAYS HER FAVORITE PART, SHE LOVES HER COKE!

Subscribe to:
Posts (Atom)