Image Map

Tuesday, May 29, 2012

No Sew T-shirt Scarf Tutorial

I've seen these scarves and always thought they was cool since they was made from an old t-shirt. I tend to give away my old t-shirts before I think of something to make with them, so after my mom cleaned out her closet I took a shirt or two from her giveaway pile to make things like this out of. I know there is a billion tutorials to make this particular scarf online but I still thought I would throw mine out into the world as well. Its SUPER easy to make and its a new fashion accessory that could completely make an outfit!!!


SUPPLIES NEEDED:
-t-shirt
-scissors
...yep thats it just those 2 things!

Lets Get Started!!

1. First Gather your supplies. With scissors and a x-large t-shirt at hand we are ready to make a super easy scarf.

2. Next we are going to cut across the shirt from armpit to armpit.

3. Also cut the bottom hem thing off! lol I know your amazed by my awesome sewing technical lingo. lol its all about the hem thingy! It should look like the pic below. 

WE ARE ONLY GOING TO USE THE CENTER PIECE & BOTTOM PIECE. You do not need the top part with the sleeves no more but keep the bottom "hem thing." You'll be using it.

4. Now we are going to cut the scarf. To do this we are going to turn it so the hem that would normally be on your side is at the top and we are going to just cut strips up it. DO NOT CUT ALL THE WAY ACROSS. leave some space at the end so all the strips are still attached to each other. I tried to make mine thin but without going too thin that when we stretch them that they will rip.


5. Now stretch out your strips! This is as easy as it sounds you just hold the top where its all attached with one hand, and use the other to grab the strips and stretch them out! (lol you can see my nephew in the picture just watching!)

 Here is a picture with almost half of it stretched so you can compare what it looks like.


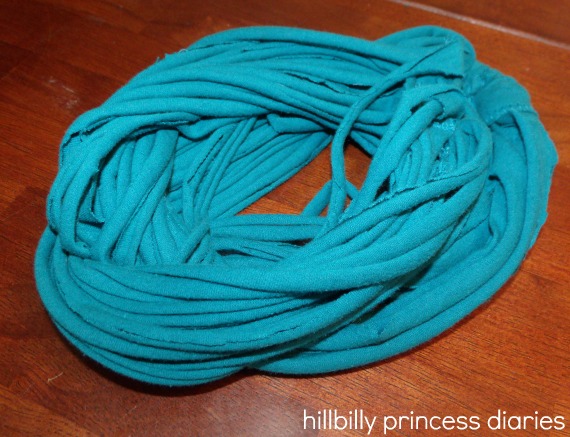
6. Next, gather the scarf by grabbing the top part where they are all attached and bring it together. 


It should be looking like this! But we are not done yet!

7. Remember the "bottom hem thing" we kept earlier, time to pull that bad boy back out!

8. Cut a small strip out of the "bottom hem thing." doesn't matter how long as long as its long enough to tie around your scarf. (I just said long 3 times in one sentence lol.) I made mine longer so I could wrap it around a few times before I tied it.


9. Wrap your "bottom hem thing" around the top of your scarf where it is all attached, tie it into a knot, and cut off any excess! 
10. Your done!!! Now you have a scarf you can wear long or you can double up and have a small chunky scarf. Either way it looks great on & you can make an outfit around this statement piece!


Sunday, May 20, 2012

Misfits Skull Cake!

So my sister's boyfriends birthday is the 29th, but he is going on a week long camping trip and she wanted me to "help" her make him a cake this past week. the reason i say "help" in quotation marks is because I did THE WHOLE THING! While she played with the babies. But it was fun & I feel like it turned out pretty good, better then I expected anyways. He is in love with the band the Misfits and he has all kinds of stuff with the skull on it. So that's what she wanted. This wasn't as hard as I expected it to be. I made a stencil & cut it out so I know it would look as close to the original skull as possible. So this is not a tutorial but just pictures or what the cake was supposed to look like and how it turned out!! Here it is:


My mom wrote on the cupcakes! LOL

We got a cake box from walmart so she wouldn't ruin it takin home.
It was pretty fun to make!


Monday, May 14, 2012

Mother's Day Strawberry Shortcake!

Yesterday was Mother's Day which I went to a cookout with my family. Me & My mom made a strawberry shortcake for the cookout & I decorated it with some Free Printable's I found online! So here it is:


The Printable's were for cupcakes and centerpiece's & stuff but I just decided hey, they could be cake decorations too! So i used toothpicks for the small round ones, i used small dowels almost like the sticks on suckers for the flags, and I took a big skewer/dowel thing and just cut it so it wasn't so tall for the big sign. I got the FREE Mother's Day Printable's Here at Amanda Parker and Family's Blog!


Saturday, May 12, 2012

DIY Photo Collage Canvas...sort of.

   Mothers day is tomorrow!! So this is a late post, sorry! I know I have been gone FOREVER finishing up the school semester and things but I'm back. I've made projects but not had time to post so I'm going to start off with getting my Mother's Day Project up! My nephew is the light of my mother's life, she loves him as if he were her own son so I decided to do a collage of mostly him!

So Let's Just Jump Right Into It...

Supplies::
-Foam Board $1
-Mod Podge (I used Matte but its whatever you prefer)
-Foam Brush
-Pictures. (I printed a bunch of 4x6s not any particular amount but I think it took like 30. and one 5x7 to be the center picture) about $15
-Scissors
-Tape
Total Cost: about $16 (since i already had the tape, scissors, and Mod Podge)


TUTORIAL:
1. First, Lay out your foam board and your pictures.


2. Next, layout how you will want your pictures on your foam board. Move & switch em around until it looks like what you want.


3. Now you will cut down any pictures that need cut down to the size you need them to be. Let me stress to cut as straight as possible. Of course all the pictures in this busy collage will more then likely distract anyone from any small mistakes you make but not cutting straight could lead to gaps in between the pictures.


4. Tape pictures where you want them. The tape won't stay on there permanently we are just doing that so the pictures don't lose there place while were working on different parts of the board. (or if you want to take a break like I did so you can set the board aside and the pictures wont lose their place.) So i just stuck some tape on the back and taped it down where I chose to place it. I will take the tape off later on.

Once the board is taped it should look like this:


5. Now one a time we are going to take the pictures off. Take off one picture, Remove the tape, Mod Podge the bottom of the picture, Put the picture back in its place, use a card to flatten out any air bubbles, and move on to the next picture. Repeat til the whole board has all of the pictures permanently attached.
DONT FORGET: to flatten air bubbles with some sort of card.


6. Once you have all the pictures Mod Podged on we will Mod Podge over it to seal it in & Give it that canvas'd look.  (Don't worry it dries clear)


7. Let Dry & WAH-LA!

(sorry for the glare on these pics caused by the flash on my camera)


Related Posts Plugin for WordPress, Blogger...