Image Map

Monday, September 10, 2012

DIY Zombie Pinata Tutorial


Onward to part 3, the final part of my DIY Zombie Decorations. You can find the original post HERE. Part 1, the Bloody Zombie Cake can be found HERE, and check out my Zombie Posters that double as a party game HERE.

Lets get started with my favorite of all of my Zombie DIY's, The PINATA!! I've never made a pinata before, this was a first..and I was pretty pleased with how it turned out. Each kid got to whack it at least about three times, (we went from smallest kids to biggest of course because the bigger kids had a better chance at busting it & we wanted to give the smaller kids a chance.) Which everyone got plenty of chances, the last kid to whack at it knocked it down, which is when each of the kids then got to try and hit it a few more times while it was on the ground. They had a blast & I was pretty proud at how well it held up to kids beatings! (which aka one of the kids said it looked like Frankenstein so this would be great for any Halloween party!)
I promise it's a lot easier then it looks!

Supplies:
1 Cardboard Box
Tape
1 Pack of Green Streamers
1 Pack of Black Streamers (both packs of streamers were $1 a piece at Dollar Tree)
Red Paint (for blood)
A piece of plain white computer paper (for eyes and teeth)
String (to hang the pinata with)
And CANDY! yummm.


TUTORIAL:
1. First I took my cardboard box (which I got off my aunt-in-law) and I broke it down. (which if you've never worked in a resturaunt & don't know what that means, you just take it out of its box form to be flat, but then I cut each side out so i had all kinds of pieces.


2. Next I figured out what shape I wanted his head to be in and started with cutting out the circle for the top of his head (which would be flat since nobody would be seeing the top of his head anyways)

3. I poked a hole in the top of the head and went ahead and put my string in & tied it in a knot on the inside. Now we don't have to worry about how were going to hang it after we've put it together and cant get to the inside as good.

4. Next I used regular clear packaging tape to start taping more strips of the boxes on to get the head to be the shape I wanted it.


5. Once you get the pinata to the shape you want it, we are going to get our crepe streamers ready which you can buy a pack of 2 for $1 at the dollar tree and one of the rolls goes a long way.


6. We are going to start at the bottom and make our way up. I first took the streamer and wrapped it around where it will be going to see how much I needed. I cut off that strip and started cutting little slits going a little more then halfway up the streamer all the way down the strip.
Then I wrapped it around it & taped it on.


7. Now we will continue step 6 over and over all the way up until we've completely covered the pinata! 


8. HAIR. I didn't get pictures of the next few steps because my camera died but it's very easy what I did. I took the black streamer and done the same thing I done for the green streamer but only for the top layer or two and top of head. This makes the zombie's hair, you can look at the finished picture to get an idea of what I am talking about. 

9. EYES & MOUTH. I also used black streamer to make a mouth & eyes, just cut strips and tape them on. The I used white computer paper to cut out teeth and eyes. I just drew out what I wanted the white of the eyes to look like and random looking teeth, cut each of them out & taped them onto the black streamer I had already placed.


10. Next I took some red paint (which was actually a 4 pack of finger paint I got at the dollar tree for $1) and I just dabbed my finger in it & smeared it all over the zombies mouth & a few spots on its face. Doesn't have to be perfect, Zombies are messy so just randomly glob it on there.


11. Cut a hole in the top of his head to put candy in, fill him up & your done.


(P.S. Sorry it took so long to get this post up, I have been working like a maniac on the house aka Project: Making Home (which don't worry I will be having more posts coming up soon on what I'm doing and how I'm slowly progressing to turn that old dump into my home. I'm actually supposed to be working on it now but thought I had better put up a blog post first. So Now I am off here to go out & start making a home LOL.)

Hope you all enjoyed my Zombie themed party decorations! & If you try them out comment and let me know so I can check them out. I would love to see how yours turns out! :)


Friday, August 31, 2012

Zombie Posters + Zombie Party Game!


Zombies! The kids here love em. This is a third continued post of my original DIY Zombie Party Decor post 1 and then Zombie Cake (zombie party post 2).

This isn't necessarily a tutorial but more of a post just showing you how I made these posters and how you can turn them into a fun kids party game!

Supplies:
Posterboard
Crayons
Pencil


1. First I drew my outline. I just drew up the zombies, not with a lot of details or anything (I plan to add those as I color them.) I hand drew these but you can print out large pictures of zombies or trace them or however you choose to do it. (disclaimer: I am no artist and am not saying I am good at drawing lol.)
I made one poster of a girl zombie, & one of a boy. So during the game they could choose who they wanted to kill and more than one kid could play at a time.


2. Next (you guessed it) I colored the zombies! I just colored them and added details as I done it such as random spots all over them to make them look dirty and red spots to make them look bloody. When I think of zombies I think of dark n gross, so I colored there skin grey, there clothes brown and dark blue, and used black and brown and grey to make shades and dirt spots all over them. I colored around their eyes black to make them look dead and added red blood spots all over them with red crayons.

& They are finished!! Here's pics of each of them!


The Game:
Adult Version: Hang the posters and stand back a few feet and throw darts at the zombies. Make it a competition, head shots and heart shots are the kill shots!!

Kid Version: fill some water-balloons with some watered-down paint (so you can get it in the balloons easier and stretch your paint further into more balloons.) Let the kids throw the balloons at the Zombies that you've hung on the wall (protect your floors and walls if you are indoors, but I highly suggest this as an outdoor game if you plan to use paint.) Remember Head shots and Heart shots are the kill shots.


Monday, August 27, 2012

Happy Birthday to ME!

Omg 2 posts in 1 day, I'm on a roll. That's actually probably sad that the day of my birthday is the day I write 2 blog posts. In all honesty it's been quiet a boring day (well not completely). I spent the first half of the day with my mother & my nephew which was fun but once I got home this evening its been slightly boring. The hubs is gone to Florida for work, well he WAS now he is going to Louisiana! The tropical storm Isaac was going to hit Florida but decided "nahh lets terrorize Louisiana some more." Part of the hubs job is having to go out of town when there are natural disasters to help when people lose their electricity and stuff. So he is gone which is why I am spending my birthday blogging! But hey, who better to talk to then my followers right?

Last year around my birthday I heard this song, so on my birthday I listened to it. Well since it is my birthday again I listened to it again lol and just thought id share it.


IM SUCH A KID! HAHA!

HAPPY 21st BIRTHDAY TO ME!

thanks for stopping by!


Zombie Bloody Cake!


Let me start this post off with, IT'S MY BIRTHDAY!! I know your probably wondering and although Id rather not tell, I'll tell ya anyways...I am 21 years old as of today! Yep, I can get drunkkkk! HAHA I'm SOOO joking,I actually don't drink. Anyways, just saying...YAY! 
HAPPY BIRTHDAY TO ME!

***********************************************

Thanks for letting me be an excited little girl for a moment, now on to this Zombie Cake!
:)
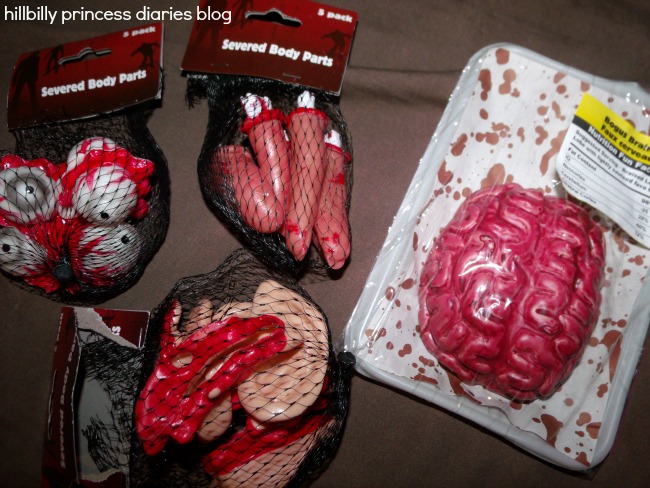
As I said in my previous post, I helped my Aunt-in-law with a few things for her step-kids birthday party. Zombie lovin kids that go by Zombie #1, 2, & 3. So we decided to make the cakes ourselves and make it a cake any zombie would love to eat, a cake covered with bloody body parts...yummm! LOL. These would also be good for a Halloween themed party, which is coming up, eeeek!

The body parts were NOT edible but they were cute & the kids loved em. We bought all these body parts for $1 a pack at the Dollar Tree. So for $4 we got 1 brain, 5 fingers, 5 eyeballs, and 5 ears. Gross right? haha!


1. Bake the cakes & let cool! First I baked the cakes. Just follow the instructions on the cake mix boxes. One yellow & one chocolate so each kid could have a cake and there would be cake options for people. Bought each cake mix at Save-a-lot, probably about $1 a piece if even that much. After baking the cakes I let them cool completely so they wouldn't melt the icing I put on it.


2. Icing cake & add body parts! I just used regular vanilla icing on the cakes, probably about $1 a container. Bought 1 container per cake, after icing it generously I still had a little bit left, HAD lol. I used white icing so you could see the blood and body parts real good! I just randomly threw the body parts around the cake so it looked like some kind of massacre happened there! I put body parts on one and Aunt-in-law done the other.

                                                 Zombie # 3's cake!
                       
                                                     Zombie # 1's Cake!


3. Add Blood!! okay so NOT REALLY! But I found this individual bottle of RED food coloring at save-a-lot. We just slung food coloring all over the cake and on the body parts! No particular way, just let it look all messy and crazy.

Beware this stuff does stain your fingers and it will take you all day to get it off! LOL


4. YOUR DONE! ENJOY!!! 


These cakes were good and the kids went NUTS!

This would be a great cake idea for a Halloween Party also if you aren't throwing any zombie parties anytime soon haha!


Related Posts Plugin for WordPress, Blogger...