Notice anything different today?? oh you shouldnt have *giggle*
LOL I redone my blog again, I didnt like how before it looked pixelated & blurry.
My background even looked pixelated & blurry!
So this time, I'm going to update you with the new things I did like create a new header with nav bar made on to it. created my new about me section with my picture there to your right--->
I also made a new button & installed a new background & made social media icons (which can be found underneath my about me introduction there on the right sidebar.)
& When I say I am going to give you blog tips I am clearly exaggerating the fact that I am just going to show you the links of tutorials that I used to help me rather than try to explain every step to you. I definitely want to give credit to those who's sites have helped me.
BACKGROUND:
For my background I got this one off of The Cutest Blog on The Block where you can get cute free blog backgrounds & it tells you how to install them once you pick one!! Easy said, easy done!!
GRAB BUTTON:
Notice my new button on the right sidebar there. Here it is again:
Wondering how I got this to match my profile. I made it on the wonderful PicMonkey! I did this the same was as I did the first time so if ya just go HERE you will find my 1st Blog Design Tips Post which is where I tell how I made my button, I just used the same process.
HEADER WITH NAV BAR:
Okay so this is probably my favorite thing that I updated, awesome right? I'm pretty excited about it & it was SOOO much easier then I thought it would be. I used the tutorial HERE by Something Swanky. I used way # 2, where the nav bar & header are together but it also gives u instructions how to make them seperate & I LOVED this!
Social Media Icons:
Okay I know I'm lacking in the social media department, I don't have a facebook or pinterest account for my blog, only my personal ones & I'm sure those can get boring. Also I just recently as you know made my twitter so I still don't even fully know how to use it or anything. So yes I only have 2 social media icons, I'm sure that my social media outlets will grow as my blog does but for now I don't want to overwhelm myself just yet. But the tutorial to make these was super easy, way easier then I thought. I just another Something Swanky tutorial that can be found HERE which shows you how to make all different kinds of social media icons for your blog. She has been a lifesaver!!
ABOUT ME SECTION:
Okay this part I also love, I had seen about me's look like this & never knew how to do it but so thrilled I have. Also the tutorial I am about to link you to shows you how to make it with your social media icons made on too if thats what you prefer. I just didnt because I plan to eventually add more social media icons in the future & figure I'd save myself the trouble of redoing the whole thing rather then just adding new icons. It's awesome though. Another Something Swanky favorite, I swear she is a genius!! Just go Here to her tutorial & she shows you step by step how to do it.
Something Swanky's tutorials helped me with the majority of my changes & made it so easy to understand. So check out her DIY Blog Design Tutorials Here. You won't regret it, she has many more tutorials to check out to make your blog look wonderful! (& her food looks delicious too.)
Thank you guys for stopping by! Hope these tips help you like they have helped me!! =)
Tuesday, July 31, 2012
Thursday, July 26, 2012
Twitter Princess!
So I have made a twitter account. I made it about a week or so ago & I'll be honest, I still don't know how to use it. I don't really know how to tweet someone or re-tweet, or answer tweets. I've not even told anyone I have it so I don't have any followers but I figure that might be good til I can learn to properly use it lol. I read a guide to twitter that can be found HERE @ Girl Loves Glam where @DaveGuymon is giving all his tips & tricks & things for twitter, but I must admit, I'm still a little confused. I learn best by doing so I will catch on but for now I'm using it mostly for tweets & updates which seems to be a more personal life twitter then a blog one because I talk more about what I am doing throughout the day then I do about my blog lol. But that's what twitters for right?? uhhh right??
So if you want to follow me on twitter I THINK my twitter name is @ashleyhbp
get it ashley hbp. as in HillBilly Princess LOL.
I have a icon under my about me in the right sidebar you can click it=====>
OR you can click the Twitter icon below & it should take you to my twitter page.
So if you want to follow me on twitter I THINK my twitter name is @ashleyhbp
get it ashley hbp. as in HillBilly Princess LOL.
I have a icon under my about me in the right sidebar you can click it=====>
OR you can click the Twitter icon below & it should take you to my twitter page.
Tuesday, July 24, 2012
Drywall vs. Paneling?!
Okay so over the past few months a battle has been going down in the princess house. Me & the hubs have had different ideas and arguments for what to do with our walls. I prefer drywall, it looks better and I just want it. The hubs however has been talking about covering the place top to bottom with wood paneling, yuck! I understand it may be some peoples style but it's definitely not mine! I grew up in a lot of places that had wood paneling & i definitely do not want my first home to be covered in it. So let's talk about the pro's & cons shall we for any future people stuck in this situation.
Its easy! It can be a fire hazard without drywall behind it
It's fast It can bulge & warp if it gets humid in the house
It's so dark & dreary
Once you install it your stuck with it (does not look good painted)
You can't patch it like you can patch a hole in drywall
I'm just sick of it!!!
Pro's: Cons:
It's easy to change color It's a little harder to install
It looks clean Might be slightly more expensive after buying everything needed (not by
It lasts longer much)
Easier to keep house cool or warm
I JUST WANT IT!!
I may add more pro's & cons as I think of them or if you have any you can suggest them to me & I'll add them to the list to be informative for someone else deciding between the 2.
The Decision:
So after this battle of the hubs saying "but paneling is cheap & easy" and me saying "but i want drywall, paneling will warp and you cant change it unlike where u can just paint over drywall once u get sick of the color" we were stuck in a rut, for months. We didn't talk about it because we couldn't come to a decision, but now a decision has been made. I have rung VICTORIOUS!
We have decided on drywall & I'm slightly afraid to post this at the risk he might change his mind but I figured I would inform you guys of our decision making. We've already bought a little bit of the drywall for the house and still have plenty more to buy. Hope this post has been helpful.
P.S.
Project Making Home Update: This is going to be a long series because me & the hubs aren't just taking out a loan or have a lump some of money we can spend on renovations, we are doing it check by check what we can afford as we can afford it, which is why its slower then most renovations so sit tight, more coming soon on it.
Thursday, July 19, 2012
(Before) Home Tour!
WARNING: Consider yourself warned that before looking at this house tour that these pics are slightly disturbing. You WILL think I'm crazy for tackling such a crazy project. This is the BEFORE Home Tour, which means hopefully in time there will be an AFTER home tour! These are pics that were taken of the house the first day I looked at it. So how your seeing it is how I was seeing it, This is exactly the shape it was in when we got it, so this is where we are starting from. I didnt clean it or nothing before the pics were taken so consider yourself warned.
As you all know I am doing a series called Project: Making Home, from top to bottom. My husband and I bought this fixer upper place, and fixer upper is an understatement. I decided to make this series to take you guys through to fixing up, decorating and making this place home! I have been wanting to post this Before Home Tour for a while now so you all can see where I am starting from so you can join me along my journey. I am warning you what you are about to see is not pretty. It's slightly a disaster and it is definitely going to be a lot of work but I think we can take it...hopefully!
Remember this home is in pretty bad shape! & I'm about to show you every last horrific detail.
I blocked out the hubs & the mother in law from the pics, lol they kept stepping in front of me while I was snapping pics.
Remember this home is in pretty bad shape! & I'm about to show you every last horrific detail.
I blocked out the hubs & the mother in law from the pics, lol they kept stepping in front of me while I was snapping pics.
The view of the living room from the kitchen!
The front door.
The floors.
The mirror that was in the house!
The view looking in from the living room towards the kitchen.
The ceiling.
The inside of the front door.
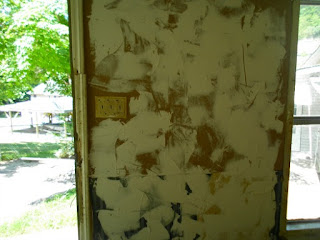
Wall by the front door. (they mudded over wallpaper?)
One of the walls.
The bar separating the kitchen & living room.
Looking @ the Kitchen from the Living Room.
Where the fridge & Stove goes. Cabinets, yep that's all the cabinet space there is other then under the sink. Gonna have to work with it.
The dining area of the kitchen. Another mirror that came with the place.
Closer look at corner where fridge goes.
Cabinets.
Inside of cabinets.
(That's a button not a bug, trust me if it was a bug I probably would have jumped & screamed & cried like a little girl. haha)
The sink, kitchen window, & glimpse of part of the living room.
Sink.
Countertops (if you want to call them that.)
Under the sink & under counter cabinets.
Under the sink (gross I know, don't judge I didnt do it lol it's how I found it.)
Side of bar.
Right off the kitchen into the hallway is the pantry. Here is the open pantry door.
shelves in pantry
bottom shelf & floor of pantry
Looking down the hallway from the kitchen.
Looking down with doors shut. (there is no bedroom door LOL)
Wood Paneling on one wall, ugh!
Looking back into the kitchen from the bedroom.
small right? Washer goes on the right & the dryer goes on the left
it's definitely gonna be a cramped space
coming in from the hallway
gross i know. we plan to replace almost everything in this house, toilets definitely being number 1.
looking in from the hallway
lol at the big white blob where the hubs & mother in law were standing
paneled halfway up the wall just like the living room
his & her closets,
real dirty inside but can be fixed lol
ceiling fan
behind the front door
halfway paneled up, mudded on wallpaper, again.
its sooo small but we have to work with the space we got,
so I will have to find a way to put all my crap in this one little room lol.
MIL started rippin wallpaper off the walls lol hence the big ball of paper in the floor
again paneled halfway down, but i think i could clean up & use that chair railing molding!
i dont know what happened here lol but needing new insulation & drywall
closet.
door coming in
wallpaper behind door
gross yellow bathtub
purple & blue? lol
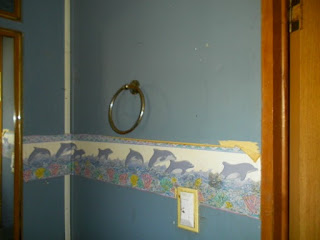
mirror, wallpaper, & purple wall lol
lol sorry for the big white blobs again
lol there's no window, so they had a piece of paneling and nailed it over it haha!
all kinds of floating floors that was in the floor of this room
his closet, but don't i have the best hubs in the world. He said in the 4 closets in the house I can have 3 of them. he's going to use one of the closets in the bedroom, i get the other, the one in the craft room, and this one for storage since they are all pretty small. Loves him! hehe!
That's it. That is my entire BEFORE home tour. Told you it was pretty gross, I'm almost embarrassed to share it, but this is exactly how we got it, I did not sugar-coat it. Now stay tuned to see how we slowly fix this dump up to be a home. We will be doing everything on our own more then likely, aside from help from a few family members who know more then us about certain things. So be prepared, i can finally hit the ground running with this series, yay!!! Thanks for stopping by you guys!!
Subscribe to:
Posts (Atom)