Image Map

Sunday, June 17, 2012

Happy Father's Day + Lack of Princess?!

First off...

Hope you are all having a wonderful father's day this year!!
<3

********

No Princess???

So I am without internet, as I write this very blog post I am sitting in a parking lot in my car with my laptop outside of sears using their wireless internet. We might possible be moving soon & no not into our new place we just bought, it is nowhere near being in move in condition, so some of our utilities we went ahead and had disconnected .(Now I'm wondering whyyy, "why why???")

I had planned on posting my BEFORE Home tour of our place since we are finally to that point were we can start working on it but because of lack of internet and packing I probably will not be able to post anything in the next few weeks. However ya never know I might, but I doubt it. But Once I get back on track with internet I will definitely be posting the before home tour very soon. I have waited so long because we had to wait FOREVER to get the place available to where we could actually start tinkering with it. We've done a few things, nothing major but no worries I've been keeping track and pictures of what were doing so I can keep you all updated, only issue is of course I'm behind on posting them because this week I've been posting Father's Day projects and things and now I'm left with no internet. 

So to wrap it up: Me=no internet = no new posts! *gasp*
But, "Before" Home Tour Coming Soon!!!


Thursday, June 14, 2012

I was FEATURED @ Ginger Snap Crafts!

OMG!! So I was just reading some of my favorite blogs most recent post and came across THIS POST by Ginger Snap Crafts Blog that features 25 cute & easy father's day gift ideas! I know this is probably not that big of a deal to any of you especially those of you who have been featured before, however I have not been featured yet and this was my very first feature!! I bout croaked when I seen Ginger from Ginger Snap Crafts really shared one of my fathers day projects. If you'd like to check out which of my projects she featured it is my Hand Print Plaque & T-shirt for Father's Day!

Sorry just had to vent somewhere I was so super excited, it's such a big deal to me!
THANK YOU SO MUCH GINGER!!


Oh & Also, I added a Pinterest Pin-It Button to each of my blog posts now! You can find it at the bottom left side of my posts, it looks like this:


If you see something in my post you like you can easily pin it to your Pinterest now. All you do is go to the post with something on it you want to pin, scroll to the bottom & hit that Pin it button and it will take you to a page with all of the pictures on that post and you just click on whichever picture it is you was wanting to pin and pick which of your Pinterest albums to pin it to and TA-DAHH!! Pinned to your Pinterest in a few easy steps!! Hope this makes things easier!

AGAIN THANK YOU TO GINGER FROM GINGER SNAP CRAFTS!!


Tuesday, June 12, 2012

DIY Super Hero Supply Kit

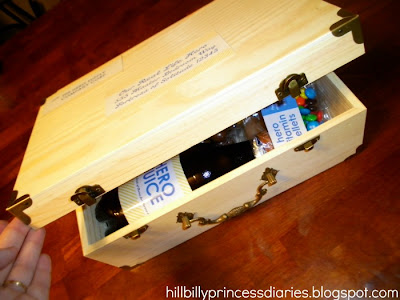
First off let me start by saying that I loved the way this turned out. This is going to be a Father's Day present for my dad since he is a superman FREAK!! He LOVES Superman, like I mean obsessed. He likes to consider himself Super Dad, so I decided to make my Super Dad a Super Hero Supply Kit. I seen this on alphamom.com. The FREE printable's can be found at that link. I was so excited to do this and again I love how it turned out. I filled it with all kind of treats that I just know my dad would love.


Supplies:
Printer & Paper (for the labels)
Wooden Box (found mine at Walmart for about $8)
Tape & Glue (i preferred tape)
Clear cellophane baggy's (I got a 40 pack for $1 at the Dollar Tree)
Snacks to fill bags (u can mix n match to fill with what you like)

 Check out this awesome wooden box I found in the craft section of Wal-Mart for 8 or 9 dollars. I love it!

Snacks consist of: Root Beer, Malted Milk Balls (aka Whoppers), Doritos, Slim Jims, M&Ms, Mentos (the chewy mint), Large Candy Bar, & Honey Bun. But you can change things out with whatever snacks you prefer.

The cellophane bags I got were actually loot bags found in the party section at the dollar tree, I just filled it with whatever I needed to and used tape to completely tape it closed.

LETS GET STARTED: 
1. First I picked snacks my dad would like & decided which label would represent each snack.
Hero Vitamin Pellets: M&Ms. 
Secret Identity Bar: King Size Chocolate Bar. 
Jerky: Slim Jims (my dad cant eat actual jerky so I assumed Slim Jim sticks would be easier to eat.) 
Hero Nosh: Honey Bun
Mints: Rainbow Mentos (my dad doesn't much like mints but I loved all the labels so I got Rainbow Mentos also known as "the chewy mint" & I think their fruity, he would like them much better then mints.)
Energy Chips: cool ranch Doritos.
X-Ray Vision Drops: Malted Milk Balls a.k.a. Whoppers (My dad loves these)
Hero Juice: A&W Root Beer (my dads favorite pop)


2. Next I cut out all the labels I printed. 


3. I started Labeling the empty bags, pop, candy bar, and box. I used tape to put the labels on the box so he could easily remove them and re-use the box for something else. 


I originally used glue stick to glue the labels to empty cellophane but once i filled them the labels started to pop off so I resorted to tape. 


I removed the label from the root beer and just stuck the new label on the white part that was left over on the bottle from the original label. I covered it in clear packaging tape to seal it on and make it waterproof.


I just taped the candy bar wrapper on top of the original wrapper.


4. Now its time to fill the backs with the snacks and tape the top of the bags closed.


YOUR DONE!! Now just fill the box with your bags of snacks and give it to that special super hero of yours!


I swear I love it, I know he's going to love it too. I hope you guys enjoy this!!!


Monday, June 11, 2012

Fun Easy DIY Father's Day Gifts!


So this is actually going to be Father's Day gifts for my Grandfather who we all call Papaw! My nephew Miguel is the light of his life, So we decided to let Miguel make his Father's Day Presents this year! But this gift idea could be made for a father or grandfather, or even a mother or grandmother for a birthday or mother's day! Both of the gifts shown are super easy & fun to make, especially for the toddler who's helping hand you'll be using!!

Cost Breakdown:

Wooden Hand Print Plaque:
Paint-0.53 Cents (just got acrylic paint, ended up using paint that came with shirt though)
Plaque-0.97 Cents
Elmer's Painters-$1.97
(All purchased from Wal-Mart)
Total: $3.47 (+ tax)

World's Best Grandpa Hand Print Shirt
Shirt + Paint Kit $9.50 
(they also have these that say World's Best Dad too, they come with blue, red, & yellow paint)
Also bought at Walmart!
Total: $9.50 (+ tax)

Tip: 
you don't necessarily have to buy the t-shirt kit you could probably get a plain t-shirt for cheaper and do the hand prints on it and if you still wanted the words you could get the Elmer's Painter's Pen and write whatever you want on it. Just a tip for a cheaper alternative.
*********************************************

Supplies:
Wooden Plaque
Paint
Painters Pen
Toddler! LOL
he was sooo ready to get started!!


HAND PRINT PLAQUE TUTORIAL TIME!!!
1. Pour paint in color of choice onto a foam plate or something disposable. Make sure you spread it a little bit so its big enough for your kid to stick their whole hand in all at once.
2. Now you are going to dip the toddlers hand in the paint (or let them do it themselves if you trust they'll do it right lol but Miguel needed showing a time or two before he got it down just right.) Miguel loved this part. (TIP: LET THEM PUT THEIR HAND ON SOMETHING ELSE LIGHTLY FIRST AFTER DIPPING IT IN PAINT LIKE PAPER OR A FOAM PLATE OR SOMETHING BECAUSE IF THEIR HAND HAS TOO MUCH PAINT ON IT, IT WILL LOOK KINDA BLOBBY LIKE MINE LOL)

3. Next Place their hand on the plaque and press firmly to get the full print. (you will probably need to help them with this part because Miguel thought it was fun to smear his hand on whatever he touched and u want a handprint not a blob! LOL.)


4. Let Dry & Write whatever message you want on it with Painters Pen. Let Dry & Then your Done!!  I originally planned to just write "Miguel 2012" but decided to write "Miguel Loves Papaw 2012"


***************************************


T-Shirt!!!
Do the same as with the plaque, just press their hand on the t-shirt
(it comes with instructions if you need it but its pretty straightforward.)


JUST FOR FUN!
just thought this picture was too cute,  he LOVED painting with his hands!

Hope you guys enjoyed this fun & easy gift idea for Dads or Grandpa's!


Tuesday, June 5, 2012

DIY Copy & Paste Onsies for Twins!

TWINS! I had to do this because my husbands cousin/best friend had twins, girl & boy! I'll never get this opportunity to make something like this again (I never know people with twins) so I definitely decided to make this now for them. I do not have pics of the baby's wearing them yet because they have not put them on them yet because I got the onsies big so they can grow into them, they are still so tiny & cant fit into the 3-6 months & 6-9 months I got for them. (the boy is a size bigger then the girl.) And also I don't know how they would feel about me putting their children on the internet. LOL.


Supplies Needed:
2 Onsies (one for each baby)
Fabric Marker
Printed words of COPY & PASTE or paper & pencil to make your own
scotch tape
Exacto knife or scissors
cutting board (if your using exacto knife, so you don't cut up your table)


LETS BEGIN...

1. First were gonna get our supplies together. (I got the onsies from Walmart, about $3 a piece, they have solid ones too.)

2. Make or print your stencils. Then use scissors or your exacto knife to cut it out. (don't forget to use a cutting board if your using the exacto knife, don't want to cut your table.)


3. Next we are going to tape one of the stencils onto one of the onsies using scotch tape. Then we are going to take the fabric marker and color in the stencil, then peel it off & fix any imperfections. (I put copy on the girls & paste on the boys because the girl was born first, but it's whatever you prefer.)

4. Next repeat the previous step with the other onsie. Tape on stencil, color in with fabric marker, peel, fix any imperfections!

5. YOUR DONE!


Related Posts Plugin for WordPress, Blogger...