SUPPLIES NEEDED:
-t-shirt
-scissors
...yep thats it just those 2 things!
Lets Get Started!!
1. First Gather your supplies. With scissors and a x-large t-shirt at hand we are ready to make a super easy scarf.
2. Next we are going to cut across the shirt from armpit to armpit.
3. Also cut the bottom hem thing off! lol I know your amazed by my awesome sewing technical lingo. lol its all about the hem thingy! It should look like the pic below. 

WE ARE ONLY GOING TO USE THE CENTER PIECE & BOTTOM PIECE. You do not need the top part with the sleeves no more but keep the bottom "hem thing." You'll be using it.
4. Now we are going to cut the scarf. To do this we are going to turn it so the hem that would normally be on your side is at the top and we are going to just cut strips up it. DO NOT CUT ALL THE WAY ACROSS. leave some space at the end so all the strips are still attached to each other. I tried to make mine thin but without going too thin that when we stretch them that they will rip.
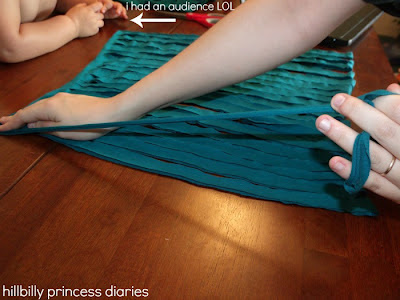
5. Now stretch out your strips! This is as easy as it sounds you just hold the top where its all attached with one hand, and use the other to grab the strips and stretch them out! (lol you can see my nephew in the picture just watching!)
Here is a picture with almost half of it stretched so you can compare what it looks like.
6. Next, gather the scarf by grabbing the top part where they are all attached and bring it together.
It should be looking like this! But we are not done yet!
7. Remember the "bottom hem thing" we kept earlier, time to pull that bad boy back out!
8. Cut a small strip out of the "bottom hem thing." doesn't matter how long as long as its long enough to tie around your scarf. (I just said long 3 times in one sentence lol.) I made mine longer so I could wrap it around a few times before I tied it.
9. Wrap your "bottom hem thing" around the top of your scarf where it is all attached, tie it into a knot, and cut off any excess!
10. Your done!!! Now you have a scarf you can wear long or you can double up and have a small chunky scarf. Either way it looks great on & you can make an outfit around this statement piece!


Came over from Winthrop to see your scarf tutorial. Just saw one similar at a gift shop over the weekend for $25. My niece has been looking for something easy to make and sell - I hope you don't mind her sharing your idea. Thanks for the easy tutorial!
ReplyDeleteDistressed Donna Down Home
This looks awesome! I love it! And I love your blog name too ;) I'm a hillbilly's wife from the South, lol
ReplyDeleteVisiting from Someday Crafts
When you are ready to press your transfer onto the shirt, if you are pressing with a hand iron you need to follow the instructions to get the best results. black t shirts
ReplyDelete