I was planning to put up a short easy DIY projects I have recently done up this past Monday but got so busy I haven't gotten the chance. I've been so busy that when I did do craft projects sometimes I forgot to take pictures as I done em. But I do have a few I've done I plan to post eventually.
MY UPCOMING WEEKEND:
But this is the last week of school. I am in college and my finals are next week, so I am in a race to get all my assignments done & turned in in time. After I get all these assignments done I have to study for finals. However, tomorrow something big is going down with our place and we may be able to start working on it this weekend (I know I know, I still haven't even showed you the before house tour...I'll get to that.) BUT, not only do I have tons of homework to do, studying for finals 2 do before Wednesday, house things to work out tomorrow, but me & my sister & her husband have been planning a shopping expedition, and it just happened to land on this weekend. We don't have malls around where I live so when we can schedule a time to go I do anything I can not to reschedule because I don't get to go often. SOOO on that happy note, I have been cramming to get homework done all week and it will continue through to next week. *my teachers must hate me cause they assigned me a billion assignments to do the week of finals :(
Here's my plan:
*Today-Errands, clean house, & cram as many homework assignments in today as possible!
*Tomorrow- I will be doing business with the house, probably all day. Then me & my sis have 2 plan out when & where were gonna meet for our road trip/shopping trip!
*Saturday-I will be on a shopping trip (trying not 2 spend much money so I can put it towards fixing up our place), It will be all day by the time we drive outta state to the closest mall, shop all day, then drive back home!
*Sunday-Wednesday: This is crunch time, no breaks! homework, homework, homework and study for finals!
Starting next weekend-SUMMER BREAK BABY!!!
So that's why no posts, I'm shocked I had time to write this one. Gotta go...like for real..I got things to do lol.
Thanks for stopping by!! :)
Thursday, April 26, 2012
Friday, April 20, 2012
Goodbye Picnik :(
I still went to the page today. I still went to Picnik...hoping it wasn't true. Hoping my favorite photo editing site that I've been using for over a year wasn't really gone. It's Over!
It's harder then I thought it was going to be. I've used picmonkey.com & it's VERY similar but they don't have near as many fonts or stickers YET. I believe they are still adding stuff though. Poor ole picnik, ahh all the wonderful times we've had together. I will miss it.
I was going to post pictures of my house tour: the before version. BUT some things came up & i didn't get too. But they will be coming soon!
Monday, April 16, 2012
DIY Onsies & Chef Apron!
On Easter when I attempted to take pictures my SD card was full! AHHHH! So this past week I cleared off my card a little bit & was deleting old photos when I came across a bunch of pictures I took BEFORE CHRISTMAS! Yeah they have been on there that long. But It was pictures of some things I made for people for Christmas. I do not have tutorials for these just photos of the before and after of each of them but I figured I would show them to you anyways.
First I made some personalized onsies for a newborn baby that was just recently welcomed to the world in October! There is kind of a inside joke to the onsies so I might have to explain. I bought a plain white 3 pack of onsies & I used the fabric markers I used in my DIY Personalized Shirt for less than $5.
They all loved them! Hopefully this will give you some inspiration even though these pics are from months ago!
First I made some personalized onsies for a newborn baby that was just recently welcomed to the world in October! There is kind of a inside joke to the onsies so I might have to explain. I bought a plain white 3 pack of onsies & I used the fabric markers I used in my DIY Personalized Shirt for less than $5.
There is an inside joke that we have with the father of the baby, my husband calls him a "bucket baby" because they work together at a tree cutting company and he uses a bucket truck (seen on the white onsie) to cut the trees instead of climbing the trees. So I dyed 2 of the onsies orange to match the orange shirts they were for their company. So I wrote "Bucket Baby" on one, since that's what my husband calls the baby's father, and drew a bucket truck on the other. The third says on the front "I wanted to climb a tree..." and on the back it says "but bucket baby's run in my family." All of these were my husbands idea, he can be clever!
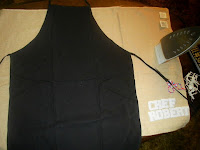
This is a gift I made for my cousin, who at all the family events & cookouts is the head BBQ chef. He is always running the grill and always wearing some kind of funky apron and chef hat!! So I thought since he is always head chef lol I would make him an apron with his name on it. I used Iron on letters from Walmart, I actually had tons of random letters left over from the shirts I made for my wedding which you can find Here: Personalized Bride Shirt, Bridal Party Shirts.
Got the apron from Walmart as well for less than $5. I just ironed on the letters and bam! A personalized apron!
They all loved them! Hopefully this will give you some inspiration even though these pics are from months ago!
Thursday, April 12, 2012
Banana Split Parfaits
Check out these awesome Banana Split Parfait's over at Amazing Things with Amazing Grace's Blog!
They are ABSOLUTELY delicious! It was to die for. It's a banana split in a cup and I seriously was in heaven eating this! You have got to try it!
You won't be dissapointed!
Tuesday, April 10, 2012
DIY Grandma Sign!
So I seen something similar to this on Pinterest but it had no link, it was uploaded by user =(. However when I seen it I thought of my mom immediately. She loves baking and cooking so the cupcake reminded me of her and she is a grandma so naturally she come to my mind. Sooo, I decided to make one of my own for her and best part is I already had all the supplies it took to make it. YAY! So Let's Go...
Supplies Needed:
*A sign or piece of wood. Mine come from the dollar tree a long time ago I got it for $1, it was a luau decoration. The back was plain, so I just painted on the back side of it so if my mom ever decides to have a luau she can flip it over and she will still have a sign for it lol.
*Paint. In whatever colors you choose, I used lime green, light pink, and white. I just used cheap acrylic paint from walmart.
*Paint Brushes. hopefully I don't need to explain why but you will need small ones to get the details of the thin lettering and medium ones for the background.
*Pen & Paper. To write out what you are going to put on it.
1. First I figured out how much space I had to put my wording. To do this I just took some plain white paper and put the wood on it and traced it only as much space as I wanted the letters to take up.
2. Next I Drew out what I wanted. I tend to pick out fonts on the computer and draw them to save ink on my printer cause I am the cheapest person you will ever meet. However it would probably be alot easier to just print out what you want on it.
3. Next Place it where you want it on your wood or sign & tape it so it stays in place.
4. Next I trace the words onto the wood using THIS TUTORIAL.
5. Next I started painting. (I probably should have painted the background color before I traced the words on but I didnt and had to try and trace around all the words with the paint so yeah, heads up lol) I painted by background Pink, Then I filled in the words with white. (Fun fact: I was out of white paint so I used white Nail Polish that I paid $1. It worked just fine.) Then I made the cupcake Icing Lime Green!
6. Your Done! Let dry & Hang! I am actually probably going to take my mod podge SPRAY clear sealer and spray over it to seal it in good, but this is how it turned out. I hope you all enjoy this, I know my family did & now I have 2 make 2 more for gifts for mother's day! lol
Saturday, April 7, 2012
Blog Tips & Updates 2!
Welcome back to my world. I figured out a few more things I was working on for my blog and again I'd like to share things as I learn them so hopefully they may come in handy for some of you! REMEMBER: I'm a beginner and am in no way a professional with any of this, so these are just the ways and sites that have helped me figure out what little bit I know.
First things first...
Customized Favicon:
If your anything like me you may find yourself thinking "what is a favicon again?" lol its the little symbol that shows up on the tab bar next to your website.
I made mine on Picnik, like all things. I'm going to be so sad when it shuts down this month :(
Tutorial Thumbnail Page:
I wanted one of these for my DIY projects and such that I love doing. But it took me foreverrrr to figure it out because all the tutorials I found you had to pay for a program thing to make it with & I'm cheap and definitely wanted a cheap version. So I used This Tutorial at Meggipeg. It gave me pretty easy to follow instructions.
Menu Bar:
I used Picnik again as always to make my buttons so they match my header. I'm pretty pleased with them. Again I used a tutorial found Here at Living Laughing and Loving. I of course made mine following their instructions but because I was making them on Picnik in order to get them all the same size I made one big long bar and put all my buttons on it so I knew they would all fit together good. Then I just cropped the same picture into seperate pictures so I have all the buttons that I know will fit each other because they were made together! I hope you can understand that I know I am not good with explaining things and tend to get confusing. You can see my menu bar above which consists of Home, About Me, Diy Projects, Project: Making Home, and Contact.I hope you guys enjoy all these helpful sites that I've found in the browsing process! Good Luck & Let me know if you use any of these pages because I would love to check out your blog after you customize it and make it your own, I love checking out new blogs!
Happy Blogging
Wednesday, April 4, 2012
New Project: Making Home!
The exciting news is coming out. I would like to have waited a little longer but I CANNOT contain myself, I'm too excited to get started although telling you doesn't hurry the process any but still. I'm bursting to tell. I'm going to be doing a new project, a HUGE project. My biggest project I've ever done.
As of April fools day, My husband and I officially became homeowners! AHHHH!!! Our first place ever! ahh! sorry I'm so excited. However its not all so simple, lol. We bought a place BUT we cannot move into it just yet, it might be a while. Since I was a kid I always wanted to own my own place & not have to rent forever... knock knock, is that my dream come true at the door?
BUT...
there's a catch. We got a killer deal, I'm talking unbeatable...because the house is something I shouldn't be, but am very excited about. A Fixer-Upper! Yes it needs work, a lot of work, that's why we got such a deal, but I'm so excited to start because that just means we can fix the house the way we want it. We may not be demolishing walls or nothing because I like the layout of the house but we will definitely have a lot of work to do on it before we can move into it. AND we can't even start cleaning & fixing it up for about a month! :( I know sad right. The anticipation will kill me, I've known for about a week and my mind is already full of all kinds of crazy ideas and things to do.
Home Tour? Why yes don't mind if i do. Before we start any cleaning or fixing (yes I said cleaning you will see it as messy as I did) I will post pictures of what it looks like inside so you know what were working with and where I'm starting at from the get-go. It's going to be a long bumpy ride! When I went to look at it, I took pictures, So you will be seeing it the same way I did for the first time. There will be a Before House Tour, and after the entire place is finished to my liking(whenever that may me) an After Home Tour. And I'll be taking you all along with me throughout the whole thing from cleaning to painting to decorating. YAY! I'm sooo excited, this is HUGE!
So join me on this huge project of turning a dumpy old house into my home, from top to bottom!
Subscribe to:
Posts (Atom)